 Skip to content

How to Install a Fish Finder on a Pontoon Boat
Before installing my fish finder on my pontoon boat, I spent two hours searching the web for a good tutorial on how to do it. Thought I'd save you some time by sharing what I learned.
If you have a good tutorial and someone to help, installing a fish finder can be a quick and simple project that takes about 45 minutes.
For me, it took more than four hours with two people because we had to figure everything out on our own without any decent guide to show us how. Not surprisingly, the directions were totally useless for installing on a pontoon boat. They only covered installation on a traditional boat.
Featured Boat Care Product
 |
Vinyl Cleaner |
Check Price on Amazon - Better Boat's vinyl cleaner quickly and efficiently cleans vinyl, leather, plastic and rubber. It removes tough grease and grime, rejuvenates faded vinyl and is perfect for boats, pools, awnings and more.
Before You Begin
Select a Fish Finder Suitable for Your Situation
I wrote some handy tips on selecting a fish finder, as well as the one that I ended up choosing here. Before you do anything with this process, be sure you have your fish finder and transducer in hand.
Some fish finders don't come with the transducer, so check your package and make sure you have both parts first.
![]()
Step 1: Determine Your Transducer Location
The transducer is the sensor that goes into the water and collects the data and sends it to the monitor. Virtually all pontoon boat owners put the transducer on the bottom of the bracket on the back of one of the metal pontoons.
You may find that the cord going from the transducer up to the monitor only has enough length to run off one of the pontoons.
For most pontoon boats that have the captain's chair on the starboard (right) side of the boat, you'll want to place the transducer on the right side so less cord is needed.
Keep in mind when placing the transducer that it's best to place it far away from electrical interference from being too close to another wire. Also, placing the transducer too close to a livewell pump (if you have a livewell on your pontoon boat) can cause interference in the signal.
You can purchase extension cables if you need to go longer, but most fish finders come with a 19' or 20' cord (5.7 meters), which is just barely enough for an average pontoon boat.
On my 22' installation, I had about 2' (0.6 meters) to spare. Although it's easy enough to get an extension cable and put the transducer on the pontoon opposite the captain's console, I wouldn't recommend it.
This requires significantly more time in installation. The greater the distance of cord, the more likely you are to not have enough signal strength to send the data. You're also more likely to run into electrical interference problems.

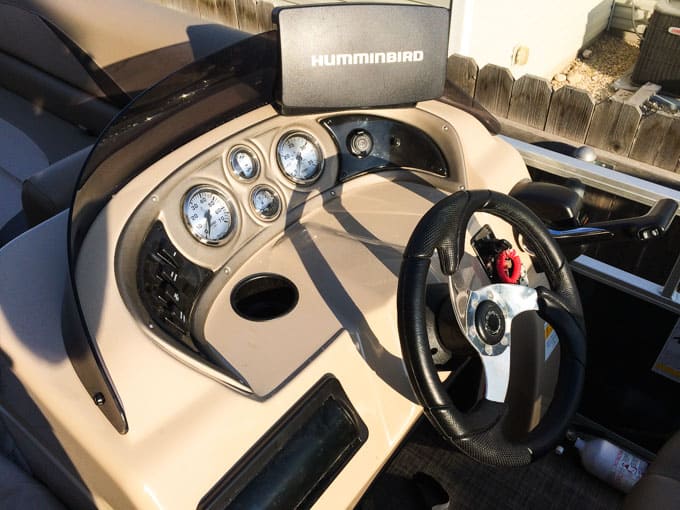
Step 2: Determine Monitor Placement
This part can be tricky. Some consoles have ample space for a fish finder monitor and others don't.
My G3 Sun Catcher does not. We stood around and debated for about 15 minutes before we found a solid location for the fish finder monitor to mount without covering the dash yet still being visible.
I found that part of the problem was that I had selected a 7" (18cm) screen for my fish finder. While I love the increased size and how it turned out, it would have been much easier to mount the screen on a standard 5" (13cm) screen.
Once you've found where the monitor will go, get down on the ground and slide up under the console to make sure none of the gauges or other wires will interfere with the cord run or the mounting of the fish finder.
While you're down there, also see where the manufacturer has run the cords through the boat. Usually, you'll find the cords going into a large hole in the deck and back toward the engine. This is where you'll run your cables.
Check one more time to make sure the cable from the transducer will be long enough to run from the back of the pontoon through the boat and to the console.
Step 3: Go Shopping
Fish finder kits come with all the materials needed for installing them in a traditional V-hull boat, but they won't have all the materials you'll need for installing on a pontoon boat. I promise.
Go shopping and get your materials first so you can do the rest of the install without issue. Don't worry, this won't hurt your pocket book nearly as bad as your fish finder purchase.
For my installation, I needed the following materials. You very well may find that you need the same stuff.
Warning: Be CERTAIN that all of the metal parts you buy are stainless steel! Just because it's silver doesn't mean it's stainless. If it's not stainless, it WILL rust!
- Six 1/4" (.6mm) bolts that are 1.25" (3cm) long
- Six nuts that fit on the six bolts above
- 6 rubber washers
- 20' (5.7 meters) of electrical shroud (plastic conduit) - This is the long coiled plastic tubing that goes around wires to protect them. For me, I used 3/4", but I should have only got the 1/4" because it would have been easier to fish the wires through the boat. The conduit only needs to be big enough to wrap around the transducer wire.
- Six metal washers
- 2 power connectors to fit the connections on your boat's fuse box - OR if you don't do anything electrical or you don't have a fuse box under your console, you'll need about 20' (5.7 meters) of electrical wire for positive and negative (red and black).
- A small tube of silicone (optional)
- Rubber grommet for cords to go through the console (optional)
Featured Boat Care Product
 |
Instant Hull Cleaner leaves hulls sparkling clean after a day of fishing without having to scrub or use a lot of elbow grease. |
Check Price on Amazon - Better Boat Instant Hull Cleaner "works like magic" to remove scum lines, algae and rust stains. It safely lifts away rust, exhaust and waterline stains from fiberglass and painted hulls. Simply apply, let sit and rinse away with a boat hose.
Step 4: Mount the Transducer
This shouldn't be too difficult. I just got a regular 1/4" (.6mm) drill bit and drilled through the bracket in two spots. Then, attach the transducer mount that came with your fish finder through those two holes and secure it with a bolt and nut.
You'll probably also want to throw a washer on there unless your bolt has a large head.

Step 5: Remove the Siding and Fish the Wire Through
Removing the siding of the pontoon boat can feel a bit scary, but it's actually extremely easy and is usually only held on by about 10 screws. Just be sure when removing the siding that you have someone holding the opposite end, or else the other end can flop down and bend the aluminum.
Be sure not to lose screws as you go along. Set each screw on the deck above you so you know right where each screw goes.
With the siding removed from the side of the console all the way back to the rear of the pontoon, you'll see where the manufacturer has snaked the cords. This will usually be on the starboard (right) side of the boat running right along the edge. That makes for an easy install.
Once you have a clear path to place the wire inside the siding, put the plastic conduit shroud around the transducer wire and fish it through all the way up to the console. It probably isn't absolutely essential to use the plastic conduit, but I certainly think it's worth a quick trip to Home Depot.
With your boat bouncing around and vibrating while running over the next 10 years, the cord can rub on the sharp metal spurs and edges of the underside of the boat and could easily saw through the cord.
A 20-minute trip to the hardware or auto parts store will likely save you a four-hour job a few years from now.

Step 6: Mount the Monitor on the Console
This part gets scary. You're gonna have to drill through your console. Place the monitor's bracket that came with your fish finder on the console precisely where you want it to be.
Next, select three or four of the pre-drilled holes where you'll put bolts through. Mark the spots with a pencil, then drill the holes.
Remember that fiberglass chips easily, so don't push too hard. You'll probably want to use a tiny bit and then progressively get to larger bits until the hole will fit your bolt.
Put rubber washers between the fiberglass and the mount. The rubber washers prevent rattling and keep your console from getting scratched by the fish finder bracket. Put the bracket on the dash and slip the bolts through the holes.
Put the nice side of the bolt up (the head of the bolt). Now, go under the console and put a large metal washer under each bolt and secure it with the nut.
The washers help to distribute the weight so that any tugging on the fish finder does not rip the nut through the fiberglass. While not really required, you may want to put just a glop of silicone on the holes in the console.
I doubt water will get through because the bolt, bracket, and fish finder will block out rain and splashed water, but just to be sure, a little silicone won't hurt.
Finally, drill an additional hole behind the bracket so you can put your transducer cord and power cord through. Be sure the hole is large enough so the connector on the transducer cord can pass through. You may want to get a rubber grommet to cover this hole so that it looks nice.

Step 7: Tie Into the Power
Fish finder manufacturers do something funny with fish finders. They usually only give you about 5' (1.5 meters) of electrical cord to go from the power source up to the fish finder. Yet, they usually instruct you to tie the power into the battery, which is usually at the back of the boat by the engine. Obviously, that's not long enough.
Fortunately, there's a better install method that won't require you to run a wire clear back to the battery, and will give added protection.
Option 1: Use the fuse box
Simply tie into the power on the fuse box under the console. To do this, you'll need the power connector plugs mentioned in the shopping list.
Check under your console and find a plug that will fit the plugs that have been tied into your fuse box. Then, simply tie into the accessory power plugs.
On my boat, I found that the factory had installed a fuse box with three accessory power fuses and had empty connectors coming off the box. This made it incredibly easy to tap into. If you aren't as lucky, you just might need a little electrical help from someone in the know, or you could choose option two.
With the empty accessory plugs coming off the fuse box, I simply bought a matching male connector and crimped it on the electrical positive and negative cord from my fish finder and plugged it in. Done!
Option 2: Go to the Battery
If you don't have a fuse box with an empty slot, or you don't know how to figure out the electrical up front, you'll probably have to buy a 20' length of electrical cable for the positive and another for the negative.
Be sure to get a heavy gauge wire suitable for a marine application. Simply string the wires back from the front console back through the boat the same way you strung the fish finder cord.
Tie the wires into the battery ... black on negative, red on positive. You can touch the contacts on the battery, but be sure not to touch positive and negative at the same time.
With option one or option two, exercise extreme caution when working with electrical and other aspects of your boat. If you don't know what you're doing, take it to someone who does.